Categories
Uncategorized

Mavericks install hangs with spinning beach ball – SIMPLE FIX

Apple released Mac OS X Mavericks yesterday, so I eagerly installed it on two MacBooks. The Mavericks upgrade hung on my MacBook Air. It got stuck on the startup screen with the grey Apple logo, with a colored spinning beach ball.

Here’s a picture of my Mac hung during it’s Mavericks upgrade:

Screenshot of hung OS X Mavericks upgrade hung with a spinning beachball
OS X Mavericks upgrade hung with a spinning beach ball

The spinning beach ball usually indicates please wait while the computer completes an essential task. I waited and waited, but my Mac just stayed at the boot screen, with the beachball spinning.

This is the “simple fix” I used to complete the install:

  1. I held down the power button of my MacBook Air until it turned off.
  2. I pushed the power button to boot the MacBook Air.
  3. It booted up fine, and lo, it was running OS X Mavericks.
  4. No problems so far after 5 hours of working on it.

I’m not sure if this fix will work for you, but it’s worth a try! Let me know how you go in the comments below.


Categories
Uncategorized

Snow Leopard to Mavericks upgrade – WOW, it worked!

I just upgraded my MacBook Pro from OS X Snow Leopard to Mavericks. My main pull to upgrade to Mavericks, was the potential for improved battery life – my MacBook Pro flies through its battery.

The Snow Leopard to Mavericks upgrade ran without a hitch, for my MacBook Pro.

Funnily, the Mavericks upgrade hung with the “spinning beach ball of death for my simpler, more modern MacBook Air. Compare:

  • my MacBook Air:  mid-2011 model, Mac OS X 10.8 Mountain Lion (1 year old product), not much software
  • my MacBook Pro: mid-2010 model, Mac OSX 10.6 Snow Leopard (4 year old product), lots of older software & exotic utilities

The hang for the Mavericks upgrade from Mountain Lion for the MacBook Air turned out to be not that big a deal – a simple fix, and the upgrade was complete.

I actually thought it was pretty likely the Mavericks upgrade to my Snow Leopard MacBook Pro would most likely fail. I had a contingency plan: My MacBook Pro backs up regularly to an Apple AirPort Time Capsule; I figured if they upgrade failed, I could always go back to Snow Leopard using a Time Machine backup.

The Mavericks upgrade detected two apps on my Snow Leopard laptop that weren’t compatible – VMware Fusion and Flip4Mac. It put the incompatible kernel extensions (kexts) from these apps into a Incompatible Software folder.

I’d really hoped to use Airplay Mirroring on my MacBook Pro to use my HDTV as an extra screen. My HDTV is hooked up to an Apple TV, and I used Airplay Mirroring to mirror my screen from my MacBook Air to the HDTV previously. The AirPlay Mirroring icon never showed up in the menu bar however. I thought this was a bug, but I did a bit of digging, and it turns out that my MacBook Pro was a shade too old to support this feature. Oh well.

And how is battery life? Too early to say, plus I never timed it on Snow Leopard. All I knew is it felt way too short. Looks like I might get 4 hours working, instead of 2 to 3 hours. If that’s so, I’ll be pretty happy.

I really like the new energy meter tab in Maverick’s enhanced Activity Monitor utility. It shows which apps are chewing the most battery, both right now, and over time. It lets me work out which apps are draining my battery, and I can change how I use the app, close it, or use an alternative, e.g. an alternative music player.

Using the energy meter, over time software developers will see if their software is inefficient with energy, and hopefully tune it up. Apple tuned the energy efficiency of Safari, and they reckon it now uses about one third the energy of Firefox. Handy to know if you’re trying to get the maximum time running on your laptop’s battery.

The upgrade from Snow Leopard to Mavericks just worked. Hats off to the Apple engineers for making the upgrade from an older OS X and apps so smooth.

Categories
Uncategorized

How long does the iOS 7.0.3 update take to install?

How much time does it take to install Apple’s iOS 7.0.3 update? While the update applies, an iPhone can’t make or receive calls & text messages. I timed the update, because  I thought others might like to also know how long their iPhone would be “down”.

What’s in the iOS 7.0.3 update?

The iOS 7.0.3 update introduces iCloud Keychain, which can synchronise passwords (e.g. for eBay) and remember credit card details across Apple devices: iPhones, iPads & Macs running the just-released OS X 10.9 Mavericks.

In the 7.0.3 update there’s also a bunch of bug fixes. The most notable is a fix for iMessages failing to send.

How I installed the iOS 7.0.3 update

How the update is done may affect the install time for the iOS 7.0.3 upgrade. So it’s clear what update process I used to get these timings, here’s how I did the update.

Firstly, I applied the update directly using my iPhone (Settings app > General > Software Update). I didn’t use iTunes to download & apply the update.

Secondly, when the iOS 7.0.3 update became available, I didn’t tap to install it immediately. I was waiting for a time when I was happy for phone to be not working. By the time I went to install the update, my iPhone had already completely downloaded the update. The update was 67 MB in size for my iPhone 5.

iOS 7.0.3 update time

The iOS 7.0.3 update time was 7 minutes. During the iOS upgrade, the iPhone shuts down, applies the update, and then reboots.

After the update, there was a guided setup process for iCloud Keychain:

  1. Enter the Apple ID password for iCloud Keychain.
  2. Set a four digit passcode for the phone, if a passcode hasn’t been set.
    (This security is a requirement for iCloud Keychain.)
  3. Configure iCloud Keychain.

I entered the password for my Apple ID, proceeded to setup a passcode, then opted to setup iCloud Keychain later. That took 2 minutes.

That gives the total time of 9 minutes to complete iOS 7.0.3 upgrade on my iPhone 5. That’s a pretty short downtime, better than I expected.

If you’re not going to wait for to iOS update to completely download first, to work out when the upgrade will be completed, you’ll need to add the download time for the update. The download time will depend on the quality of your Internet connection and how quickly the servers that deliver Apple’s iOS updates can supply the download.

iOS 7.0.3 update time on iPad, iPad mini and other iPhone models

I’m not sure how long the iOS 7.0.3 update will take for the iPhone 5s, iPhone 4s and iPhone 4. I suspect a similar time to my iPhone 5, but probably slower for the older models. For the iPad & iPad mini, the time is likely to be similar, again probably slower for the old models.

If anyone wants to post their install time on different iPhone models, the iPad or iPad mini in the comments, so we have some actual measurements for the iOS update times on those devices, that would be great!

Categories
Uncategorized

Outlook Mac high CPU usage: possible fixes

Ian, a MacCrazy reader writes:

My MacBook Pro (2.66 GHz, 8 GB RAM, 500 GB HD, OSX Lion 10.7.4) started to be very hot and noisy (fan) immediately after I installed the Microsoft Office for Mac Service Pack 2 (14.2) update specifically whenever I ran Outlook, despite no problem with Outlook prior to this. The CPU activity showed that Outlook was using approx. 90% of CPU. After 5 days I removed MS Office completely and reinstalled it without updating to SP2 and everything was fine again. Then some days later, when the fix was released for SP2 (14.2.1), I again installed it, and then the problem of excessive noise and overheating has resumed. Then, to my dismay, my MBP stopped working altogether – Apple Support advised me to return it to the dealer, who found that a cable to the hard-disk was burned out — they replaced it within a day and I got my MBP back intact. I tried your suggestion for a SMC reset, but the CPU hyperactivity, the overheating, and the noisy fan persist whenever I try to run Outlook (not otherwise). I would be so grateful for any help — can you advise me?

UPDATE – 6 Novemeber 2012: It looks like we’ve got a fix – thanks to Alastair Brown for reporting it. Go to the end of the article for the fix.

Ian, sorry to hear you’re having problems with Microsoft Outlook having high CPU usage. I run Outlook for Mac, mainly on a MacBook Pro running Mac OS X Snow Leopard, and occasionally on a MacBook Air running Mac OS X Lion, but haven’t had this issue. Most probably, it’s configuration specific.

Googling “outlook mac high cpu“, other people seem to have your exact problem. Outlook runs at 100% CPU, using a whole CPU core. This makes the Mac hot, and in a laptop depletes the battery quickly.

A SMC reset won’t stop Outlook from burning CPU.

A number of fixes are suggested on these pages:

The fixes suggested are:

  • Apply the latest updates. You’re on update 14.2.1; there’s a newer version available: Microsoft Office 2011 for Mac 14.2.2 Update. I doubt this will help you.
  • Rebuild the Outlook database, by holding the Option key when starting Outlook. This has helped no-one with this issue that I can see.
  • Turn off the SyncServiceAgent.
  • Verify the Outlook Identity.
  • Delete your accounts (identities) and add them back in.
  • Rebuild your Spotlight index.
  • Open Outlook 2011 without running schedules or trying to connect to a mail server. Hold the Shift key when starting Outlook.
  • Remove Outlook preferences.
  • Start your Mac in safe mode.
  • Create a new Mac user account and try Outlook from it.

I don’t see anyone clearly winning. That is to say, I can’t find anyone who has really fixed this yet. This high CPU usage issue seems to related to the Contact management features of Outlook.

If you’re up for trying all of these Ian, perhaps we will be the first to crack it!

If you’re out of patience, I’d go for the solution you’ve already found:

  1. Uninstall Microsoft Office for Mac
  2. Do a fresh install of Microsoft Office 2011 for Mac
  3. Do not apply Microsoft Office 2011 Service Pack 2
  4. Turn off automatic updates to Microsoft Office
  5. Knowing that your copy Microsoft Office is not being updated, and so won’t be protected against new security vulnerabilities, only open Word, Powerpoint and Excel files from trusted sources.
  6. Log this bug with Microsoft so they fix it.
  7. Check the Internet every few months to see if Microsoft has released and update to fix this bug, and if so, turn automatic updates back on. (Take a TimeMachine backup first, so you can revert your Mac if the update doesn’t really fix the issue.)

You could also try using Mac Mail instead. It typically has about 1% CPU usage. Mac Mail will certainly work well for POP and IMAP email accounts. It does have support for MS Exchange email accounts; I haven’t tried this myself.

Ian, just for interest, a couple of questions:

  1. Did your MacBook Pro come with Lion installed, or did you upgrade to Lion?
  2. Did you ever have Microsoft Office 2008 installed on that Mac? (e.g. From using the Mac Migration Assistant to port your apps and settings from an older Mac.
  3. What types of email accounts are you using? MS Exchange, POP and/or IMAP?

Update – 6 November 2012

Alastair Brown reports that upgrading to version 14.2.3 solved the issue. He noted he did rebuild his identity, so that may be a necessary step as well. Please comment below to let us know if the upgrade fixes the issue for you. Thanks Alastair!

Categories
Uncategorized

Happy 2012 Apple! MacBook Air Sales Jump by 3 Times

MacBook Air sales have jumped by 3 times. This jump has seen Apple sell over a million MacBook Air laptops. What’s fuelled this massive jump?

MacBook Air Sales Figures

MacBook Air Sales Figures

Here’s some important Mac sales statistics:

Apple does not release sales figures for individual Mac products. We can, however, combine the information above to estimate MacBook Air’s shipped in Q4 2011.

This an estimate that Apple will have sold 1.1 million MacBook Air laptops globally in the last quarter.

This estimate correlates with two other estimates by Ultrabook News, which put MacBook Air sales at approximately 300,000 units a month.

Dramatic Rise in MacBook Air Sales

In June 2011, MacBook Air sales accounted for 8% of all Mac laptop sales. The following month, the MacBook Air accounted for 22% in Mac laptop sales. By October, the Mac Air was 28% of laptop sales.

This dramatic rise in MacBook Air sales is mostly due to introduction of new MacBook Air models on the 21st of July, 2011. These new models use ultra low voltage Intel Core i5 & i7 Sandybridge processors, giving performance gains of 2 to 3½ times the previous models’ Core 2 Duo processors.

The new MacBook Air models have bought the MacBook Air’s processor performance up to the level of a entry level MacBook Pro (the 13 inch model). The MacBook Air retains advantages over the MacBook Pro of being considerably smaller & lighter, and coming standard with a fast solid state flash disc.

The new MacBook Air models also added a Thunderbolt port, a new connection developed by Intel. Thunderbolt enables connecting multiple external displays, high speed networks, disk arrays and other demanding peripherals, at speeds of up to one gigabyte per second. A “daisy chain” of displays & peripherals can be connected to the MacBook Air by simply plugging in a tiny connector to the laptop’s side.

The massive performance boost and high-speed connectivity has made the new MacBook Air more attractive to potential buyers than the last MBA model – enough to give a 3½ fold increase in sales over the previous models. The previous MacBook Air models, using Intel’s Core 2 Duo processors, accounted for only 8% of Apple’s laptop sales.

More MacBook Air Information

Mac Crazy has in depth, original, independent analysis of the the latest MacBook Air models, including:

MacBook Air Future

The proportion of Apple notebook sales from the MacBook Air 2011 model continues to rise. There’s conjecture that the MacBook Pro models will follow the MacBook Air, losing their DVD burners and hard disks to become more svelte. There’s also evidence in Apple’s supply chain that a MacBook Air 15 inch model will be introduced in 2012.

What do you think the future of the MacBook Air and Pro be? Will the two products merge? Let us know in a comment below.

Categories
Uncategorized

The Eight Essential Keys to Great Recordings

Do you want to make great recordings? Do you want to get a studio-quality sound? These eight keys cover the essentials to make great recordings.

This article is written with the Mac in mind, but I started out recording music on Windows, so I know these essentials work for making music on Windows 7 as well.

We use Sarah’s current recording setup as an example. Sarah, a Mac Crazy reader, uses Garageband and her MacBook Pro’s built-in mic to record herself singing and playing guitar. Sarah wants to improve the sound quality of her music recordings, and she’s on a budget. Here’s Sarah’s original question:

Heyyyy :) i have the 13 inch macbook pro, i play acoustic and electric guitar and sing aswell, when i go to record i simply use the macbook pro microphone and either play guitar and sing together or record each seperately. i use a Goodmans ACC2011 microphone which is pretty old and uses a jack lead ( i think thats the name ) which you cant detach from the microphone and im guessing its just a karaoke one.. i use it with a ALBA karaoke machine haha and i plug my guitar into a big good amp ive got using a jack lead? (peavey). im wanting to make my sound quality a lot better but dont know where to start, i also use garageband to put it all together. i was thinking a new microphone, a pop screen thing and a interface? but im not sure which to get and what will be compatible with what ive already got. im only 16 and the music is only for home use which will be uploaded to soundcloud or something so its nothing major.. yet :Pand as im only young i really seriously need it to be affordable as i have hardly any money haha! if you helped i would seriously appreciate it as ive been searching the web for ages trying to find help :) thanks

oh sorry i also use a yamaha PSR-262 sometimes to record keyboard and singing or just a keyboard part.. so any leads needed for that would be helpful 🙂 thanks

Source: Comments from “What’s the Best MacBook for Making Music?”

Recording Equipment, Setup and Environment Affect the Sound

When you record, a number of factors affect the quality of the recording and “color” the sound:

  1. Which recording equipment are you using (e.g. do you use a studio microphone to record your vocals or the mic in your laptop)
  2. How have you setup that recording equipment (e.g. when mic’ing  guitar amp, do you put it more to the center of the speaker cone, or more to the side)
  3. What environment are you recording in (e.g. are you in a room with tiled floors and a tall roof, giving a natural, spacious echo to any sounds, or are you in a small bedroom, with carpet and duvet damping any echo)

Let’s take Sarah’s current recording setup as an example of how these factors affect sound. Sarah’s using a Goodmans ACC2011 microphone for vocals. From what I can gather, it’s a cheap dynamic mic ($3.21 for a used one on eBay) with a quarter inch TRS (tip-ring-sleeve) plug. Sarah is using the Goodmans mic with an ALBA Karaoke machine. Together these two lo-fi items will most likely conspire in a sonic assassination of any singer. There’s always the possibility of a fluke where the combo suits Sarah’s voice, and perhaps brings out her unique sound. For example, to record Michael Jackson on Thriller, a relatively inexpensive Shure SM7B Dynamic Microphone was used instead of a high-end expensive studio mic, because for Michael’s voice it sounded better.

Sarah is running her electric guitar to the Peavey amp and then recording this through a mic (albeit a laptop mic). While it’s possible to plug the guitar directly into an audio interface, going through the guitar amp adds more character to the sound, such as overdrive. It’s a good choice. Put a mic in front of the amp, to the side of the speaker will give a warmer guitar tone. Putting a mic behind the speaker will give a muffled tone, giving a different sound. It is possible to record directly from the guitar and have the computer simulate the sound of different amps and effects pedals, for example with Guitar Rig.

There’s lots of options for recording the acoustic guitar. Does the acoustic guitar have a pickup in it? We could plug it straight into the audio interface, put a mic on it directly, run it through the guitar amp, or even the karaoke machine for something different. The different method will give different colored sounds. If the acoustic guitar is recorded unamplified with the MacBook Pro’s built-in mic a few feet away, the guitar may sound a bit flat.

The tiny condenser mic built-in to the Mac laptop, two to six feet away from your lips, instruments or amps, won’t really give a rich, full sound. The intensity of the sound is lost as it merges into the room, and more of the room’s character is added. As Sarah sings or plays guitar, the sounds will echo off the ceiling, walls and floor, and that echo – distinct or muddy, pleasing or not – will be coloring all her recordings.

The Yamaha PSR262 Keyboard has small built-in speakers giving a fairly tinny sound. The tinny sound recorded at a distance through the Mac Pro’s mic is unlikely to give an inspiring, emotionally evokative sound.

Improving Home Studio Sound

The good news is there’s massive room for improvement in a recording setup like this. We’re at an incredible time, where high quality recording equipment is cheap and easily available. You can achieve a near studio-quality sound on a budget. Here’s some keys to to improve your sound and great great recordings.

Key 1 – Try Close Micing

Close micing doesn’t mean putting mice close together! It means getting the mic closer to the sound. The closer you get to the source of the sound, the more of its essence you capture. The sound will have more presence. It penetrates more. It’s more intimate. You’ll hear more detail. They’ll be a greater range of sound, from soft to loud: At a distance a whisper is nothing, and a crashing sound can be shrugged off. Up close, a whisper is inside you, and crash rings your body like a bell.

If you’re recording from your laptop mic, you can move the laptop much closer to the sound source. (Be careful not to dent your MacBook Air or Pro while moving it around excitedly. The aluminium is easy to scratch & dent. Put it on something stable and not slippery. Ensure its elevated a bit to make it hard so noone steps on it. At least until they release indestructible carbon fibre Macs.)

As the mic goes closer, the color of the sound changes. For example, as the mic gets closer to a singer’s mouth, the bass in the singer’s voice tends to become more pronounced. This is called the proximity effect. You may bring the mic in close, and then take it back out slowly to give the mic a bit of “air”, until you get the sound you want.

You may need to drop the recording gain on your audio interface or in software so the recording doesn’t clip – where the level meters hit their maximum and turn red. Digital clipping gives an unpleasant transient mufflings of the sound – a lot of very short lived dull thuds.

If the recording still sounds distorted, but it’s not going red in the meters, the sound may be too powerful for the mic, i.e. above the maximum sound pressure level (SPL) it can mechanically register. If this happens, put more space between the mic and the sound source.

Key 2 – Monitor the Recording and Adjust

Plug in some earbuds or headphones you have lying around to listen to how you sound when you record. This is called monitoring. This is useful because you get immediate feedback on how you sound, and make adjustments on the fly. Choosing to monitor your recordings as you make them will make you a better recording engineer much faster. (Think how photographers are are now getting better perhaps five times faster because they don’t have to wait for their film to be developed. Don’t deprive yourself of the instant feedback monitoring gives you.)

For example, while you monitor your recording, you can play with the distance between the sound source and the mic until you hit the sweetspot and get the sound you want. You can hear the effect as you move close into the mic while you whisper a passage, and then move the mic out while you sing a loud note.

Music production software, such as Logic, Cubase and Garageband can loop what your recording back to the headphones, along with a click track, or the other tracks in your project tracks. Effects to your track, such as reverb or a vocoder, can be applied in real time, so you can hear how the final result will sound. There is a slight delay – the latency – between the sound travelling into the computer and the sound coming out. This latency is typically 0.01 of a second, but it can throw time sensitive people.

Most external audio interfaces offer hardware monitoring, where you hear whatever is plugged into the interface directly over the headphones, without any processing by the computer. It’s good to have a good set of “cans” (headphones) to monitor the recording. Open-back headphones leak a lot of sound, which could be picked up by mics during a record, so better to get close-back headphones. You can use earbuds to start with. Sound isolating ones earbuds would be better, again because they leak less sound out. There’s a range of studio headphones here from $18 to $300.

Key 3 – Mic Each Vocalist & Instrument

Recording everything together off a single mic is simple and can work, particularly if you’ve really got the guitar and vocals well practiced, you’re using a beautiful mic, and the mic is positioned perfectly to balance your voice and guitar. Sometimes a stereo pair of mics is used for this type of recording.

Still, have you noticed that it’s rare for a commercial album to be recorded with just one mic recording all vocalists & instruments at once? That’s because it’s far easier to get great sound by recording each vocalist & instrument in the music with a mic focused on just that vocalist or instrument. This makes it far easier to capture each sound source clearly.

Key 4 – Record Each Vocalist & Instrument to a Separate Track

By capturing each vocalist & instrument to a separate track, each part in the music can be modified individually – for example we could make a vocal track louder, or add a reverb effect to piano track. GarageBand provides multitrack recording for free.

To get a separate track for each voice and instrument with only one mic, record just one voice or instrument at a time. Singing or playing one part at a time really allows you to just focus on that part and put everything into it. Even musicians who are very accomplished and practiced with singing and playing their instrument(s) at the same time, such as Stevie Wonder, will often just focus on either singing or their instrument while laying down a track. If you have multiple mics, you can get a separate track per part by having a mic per vocalist and instrument, and recording all the parts at once. For example, to record a song with guitar and vocals, you’d need two mics and an audio interface with two mic inputs. If you played a stomp box as well to give a bass beat, you’d need a three channel audio interface to record them all at once.

Key 5 – Try Using Some Effects

You can add effects to fatten up your sound or give it depth. It’s normal to give vocals a bit of “reverb”, otherwise known as delay or echo. For electric guitar, you can play with adding a stereo delay.

Key 6 – Mix the Tracks

By having each instrument recorded in a separate track, you can adjust their volume levels so they sit together well. More advanced is to adjust their levels over time (like bringing the guitar up louder for a solo).

You can also “EQ” tracks so they sound better, and sit better together as a whole. Equalization (EQ), is where you cut or boost specific frequency bands for a track. It’s a more advanced version of adjusting a graphic equalizer on a stereo.

Key 7 – Use an External Audio Interface

The next key is to use an external audio interface. An external audio interface allows you to connect mics and instruments to your computer. Mics use a TRS jack (also called an unbalanced connection) or XLR connector (also caller a balanced connection). You can also directly connect instruments to an audio interface for recording, such as guitar and keyboard.

If you’re on a budget, I’d try the ART USB Dual Pre Two-Channel Preamplifier/Computer Interface ($99 list price, currently $49 at link). You could plug the Goodmans mic into this, and then you can close mic your voice, your acoustic guitar and your electric guitar amp, hopefully giving a richer, more dynamic sound. The unit above is cheap and got great reviews.

I like that the ART Dual Pre just uses normal USB sound standards, so it doesn’t need any special drivers. In the past, I have wasted a lot of time on Windows with drivers and firmware updates to get external audio interfaces working. Apparently this still happens, even sometimes for Mac. So, if you plug an audio interface into a Mac, and you can’t see it listed in the Sound panel of System Preferencesstraightaway, don’t waste too much time trying to get it to work. Swap it for something that works out of the box, and won’t give you trouble.

I also like that the ART Dual Pre has two active channels, so you could record two mono tracks at once, for example guitar and vocals. The M-Audio Fast Track, which costs twice as much or more on the street as the Art only handles a single channel at a time.

Another great feature of the ART Dual Pre is that it provides phantom power to mics, which is necessary for most studio-quality mics. The ART Dual Pre draws the power it needs from the Mac over USB. You can augment this power with a standard rectangular 9V battery, and for some mics you might get you a cleaner, crisper, livelier recording – more juice can help the mic respond faster and more accurately. I wouldn’t bother with a 9V battery at this stage. Apparently the battery tends to get stuck! If you do try it, just put the battery in half way, and pull the battery out when you’re not using it.

Key 8 – Use a Good Mic

Next step would be to get a decent mic. Professional mics use three pin balanced XLR connections to reduce noise from cables, rather than a TRS jack. Dynamic mics are hardy mics that you typically see handheld by performers on stage. For recording, people tend to use condenser mics, as they give a richer more detailed sound than dynamic mics. Condensor mics need a power source. This is provided by phantom power from the “mic preamp”, a battery, or a separate power supply. Note that the ART unit above does supply phantom power.

Large diaphragm condensor mics work well for most people for vocals. Large condensor Instead of a mic capsule the size of pin, large condensor mics have a diaphragm about an inch across. Very nice mics of this type tend to have tube electrics for warmth.

A high quality, well reviewed condenser mic is the Rode NT1A Anniversary Vocal Condenser Microphone Package ($369 list price, currently $229 at link). I own a high end Rode mic (a K2) and have visited Rode’s headquarters in Sydney, Australia – I can recommend their mics without hesitation. This is a mic you can keep and use for a long time.

The darling of the cheaper mics is the green & gold MXL V67G Large Capsule Condenser Microphone (list $279, currently $99 at link). Users of this mic just gush about the sound:

This mic is fantastic! I’ve been singing, writing, and recording for almost 30 years and this mic is pretty much just as good as all of the silly expensive German mics I’ve used in larger studios over the years. There’s a very slight presence peak, but nothing like most of the other Chinese mics. It isn’t shrilling or peaky at all. Male tenor vocals and acoustic guitar sound great without any need for EQ whatsoever beyond a hi pass filter for the sub 100hz stuff. This mic is also an excellent candidate for a Michael Joly mod, he calls it one of the 7 audio wonders of the world because it makes no sense that this mic is this good at under $200. Michael mods these mics and you’d be hard pressed to be able to tell the difference between this one and the famous U87 with the German name that starts with an “N”. I’m using it totally stock and it’s been great. Buy it.
– R. Jackson, Newburyport, MA USA

If you’re really on a tight budget, there’s the Behringer C-1 Studio Condenser Microphone (list $88, currently $39 at link), which people report to be competent.

For the cardioid mics, you’ll need a pop filter if it’s not included.

Sarah could use a condensor mic for vocals and then try using her existing Goodmans dynamic mic for recording the electric guitar from the Peavy amp. If the Goodmans doesn’t cut it, the weapon of choice for micing the amp is a Shure SM57 Dynamic Microphone (list $146, price at link $86). There are cheaper mics, but this is keeper.

For all mics, check a microphone stand mount is included, and if not buy the mount to suit that mic. Also buy a microphone stand, and microphone cable (usually XLR male to XLR female), unless they’re included.

Conclusion

I hope the eight essential keys of making great recordings help you to cut some great tracks. Link to your tracks (e.g. on SoundCloud) in the comments – I want to hear!

If this article was useful for you, please click the Like, +1 or Tweet buttons below. If you really like it, please link to it from your website or blog.

Categories
Uncategorized

MacBook Air & Pro External Displays – Tips for Buying & Using

Buying an external display for a MacBook Air or MacBook Pro? Here’s some quick buying tips, including how to find a cheap, thin, full HD screen for $152.

Already got an external screen? There’s tips for the best way to use your external monitor with your MacBook.

Most of these tips also apply for getting a main display for the Mac Pro and Mac Mini, as well as getting a second iMac external display. Read on for tips, and a bit about Apple’s new Thunderbolt Display.

Tips for Buying an External Display for a MacBook Pro or MacBook Air

  1. Get a wide screen. They’re great for wide content, like video or spreadsheets. They’re also good for viewing two windows side-by-side on one screen. Luckily, widescreens are pretty much standard now.
  2. Get a full HD (1080p) screen instead of a lower resolution screen. Lots of pixels means seeing lots of content with good detail. Less scrolling to do. More context. Full HD screens (1920 x 1080) are now cheap – $170 for an entry-level display.
  3. Buy around a 24 inch size. If you get a smaller HD screen, it may be hard to read. I find 30 inch and larger screens too big to take in – it’s like being at an IMAX, I’m moving my head around excessively to take in the contents of the screen. With a 30 inch plus screen, I also feel washed out from all the light blasting into my eyes all day.
  4. Strongly prefer screens with a DVI port. Other ports will work (VGA and HDMI), but DVI was designed for high resolution digital computer monitors. If the screen only has a VGA port, it’s probably pretty old technology. If the display only has HDMI ports, the display is intended as TV – it may be fine, but it probably wasn’t designed to be a computer monitor, to be used close up, for a whole day. To me, TVs have a different quality to their image – I haven’t asked a tech about why – whether the panel, refresh rate, viewing angles, color range or image processing is different between an LCD monitor and an LCD TV.
  5. Make sure the screen is bright enough for you. Nearly all screens have sufficient brightness now, but there are still cheap screens with low brightness and contrast. A dull screen makes you stare harder to perceive everything.
  6. If you’re collaborating with others, consider screens with wider viewing angles. Cheap screens can become hard to see as soon as you stand up (the panel’s vertical viewing range) or move left or right (the panel’s horizontal viewing range). The more expensive the screen, generally the further you can move and still see the image properly. This means others can sit or stand beside you, and check out your project.
  7. Try out higher-grade screens. More expensive screens have more accurate color (gamut), they’re brighter, have better contrast ratios, faster response, and have HDMI interfaces (e.g. for a Blueray player). Better screens do “feel” better to work off – there’s a crispness that makes them easy to read, yet not tiring. Sometimes the quality difference is only obvious side-by-side: you could check out a few external screens at a computer store.
  8. Buy a Mini DisplayPort to DVI Adapter. Apple sell them ($29). You’ll need it to connect your MacBook Air or Pro to the external display.

At home, I was on a budget and got an AOC RAZOR LED e2343F 23.0″ Full HD LED Monitor Ultra-slim 12mm, LED Panel & Backlight for $169. (This was in Australia from i‑Tech.) I was shocked by how good the image was for the price. It’s light & slim. The white base looks strange with the black bezel. At the time of writing it’s available in the U.S. for $152, according to Google Product Search.

At work, I have a LG display. It’s more expensive than the AOC screen ($250 vs $169), and a bit bigger (24 inch vs 23 inch). For me, the LG feels like just the right size. The LG can also rotate in its stand to a vertical orientation (i.e. portrait/tallscreen instead of landscape/widescreen). Portrait mode is useful for word processing , or designing pages for print, where you can see a whole page at a time. If you’d like the LG’s product code, leave a comment below, and I’ll look it up.

Tips for Using External Screens

  1. Turn the screen brightness down to where your eyes feel relaxed. It took me 28 years to work this out! Over bright screens wear me out. I can feel my eyes straining. Make the screen bright enough so the color is good, and text is readable, yet soft enough that your eyes don’t feel achy.
  2. Have a main screen directly in front of you, with a keyboard and trackpad in front of it. I’ve run off two screen systems for years. When I sit in the middle of two screens, my neck is either twisted left or right all day. Not so good. I’ve found it works better to have a a big screen directly in front of me, with windows I look at 90% of the time. I then put the smaller screen to one side, with windows that I look at less often (e.g. email or a webpage I have open to refer to). Since the laptop will be the smaller screen, this means springing for an external keyboard and mouse. Worth it. If you use the wireless Apple keyboard and trackpad or mouse, it’s easier to take your MacBook away – two less cables to unplug.
  3. Three screens may not be heaven. I’ve ran off three screens for about six months. I slowly noticed three screens felt crowded and that I got tired from three screens blasting photons at me. Dropping back to a single big main screen front and center has felt much better, and I’ve got more energy at the end of the day.
  4. Try one big screen, instead of a big screen plus laptop on the side. If it feels better with just one big screen, you can close your MacBook Pro or Air and it will keep on running (instead of sleeping), provided your external monitor, keyboard and mouse are connected. Ah, the simple life!

Apple Thunderbolt Display

Apple has offered a fairly giant Mac display display for awhile, both as a separate screen – the 27 inch Cinema Display, and well as built in to the 27 inch iMac. Now the Cinema Display has been upgraded to the 27 inch Thunderbolt Display.

Thunderbolt technology uses the video cable to send high speed data to external devices as well as sending video to the monitor. The Thunderbolt Display has a Gigabit Ethernet port, a few USB ports, a Firewire port, and a webcam, and they all come courtesy of plugging in one tiny mini DisplayPort connector to your Mac Pro or Air. You can daisy chain more Thunderbolt devices onto the monitor, like disk arrays.

Thunderbolt turns the tiny “Mini DisplayPort” connector on the current MacBook Air and MacBook Pro models into a docking station connector. You can flounce around with your tiny two pound, 11 inch MacBook Air. Then get to the office (or come home), plug in one tiny cable, and suddenly that tiny laptop has become a big powerful computer workstation, with a big display, fast networking and large capacity disk storage. It makes the Thunderbolt connector the modern day equivalent of a docking station, but way more convenient.

I suspect it’s the way computing will go: light, small, fast, thin laptops. When you need big screens and storage, you just plug in one cable. Thunderbolt, made by Intel, is finding its way on Windows PCs and laptops in 2012. One day day you’ll probably be able to just plug your iPad or iPhone into a Thunderbolt Display to get a full sized workstation.

I tried out the Thunderbolt Display’s predecessor, the 27″ Cinema Display. It is a gorgeous display. It has the same crazy better-than-HD resolution: 2560 by 1440 pixels. (Full HD is 1920 by 1080 pixels.) It’s pretty big – I don’t know if I could live with the “IMAX head swivel” effect, but perhaps it would work if I put a big distance between the monitor and I – I’d need a deep desk. I’d really like to try one out for awhile. (If you have one, please comment below to let us know how you find it!)

I mention the Thunderbolt Display in case you have the money, appreciate the quality, and it’s not too big for you. I’ve tested the new MacBook Air running a Cinema Display, which has similar screen specifications and video technology to the Thunderbolt display – you can see the video at MacBook Air external display.

Thanks!

Thanks for visiting Mac Crazy! Do you have any tips, questions or comments about using external monitors with MacBooks? If so, please use the comment box at the bottom of the page.

If you found this article useful, please help share it – please click the +1, Like or Share buttons below. It just takes a moment! Thank you!

Categories
Uncategorized

iPhone 4S Prices – Worldwide Guide

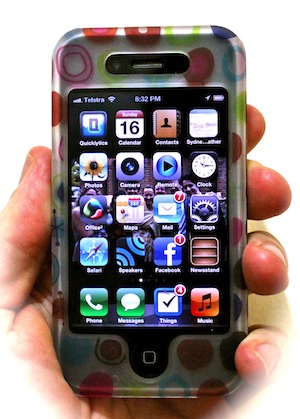
Image of an iPhone 4, it's price having dropped, held in hand
iPhone 4 price drops with iPhone 4S release

Here are the prices for Apple’s new iPhone, the iPhone 4S. Prices of the cheaper iPhone 3GS and iPhone 4 are included for comparison. Most iPhone 4S prices quoted in the article are for an unlocked iPhone 4S, while some iPhone 4S plan prices are included.

With release of the latest iPhone, the iPhone 4 and iPhone 3GS prices have dropped, making owning an iPhone more affordable.

This article does not include used iPhone prices, so no iPhone 3G prices are provided.

iPhone Prices

The table below compares prices for the Apple iPhone 4S range. The iPhone 4G, iPhone 4GS and iPhone 5 have not been released yet. When these iPhone models are released, I’ll add their prices.

Country iPhone 3GS Price (8GB) iPhone 4 Price (8GB) iPhone 4S Price (16GB) iPhone 4S Price (32GB) iPhone 4S Price (64GB)
Australia A$449 A$679 A$799 A$899 A$999
Canada C$375 C$549 C$649 C$749 C$849
Deutschland (Germany) 369 € 519 € 629 € 739 € 849 €
United Kingdom £319 £429 £499 £599 £699
U.S.A. $0plan $99plan $199plan $299plan $399plan

(Source: Apple’s Online Store)

This iPhone 4S price list above is for the five countries with the most visitors to Mac Crazy. I’ve put more iPhone 4GS prices below, with nine more countries in Asia, Europe and Oceania.

If you’d like to know how to quickly compare iPhone prices across countries, I’ve put together a YouTube video that shows how at the bottom of this article.

Is your iPhone price question already answered? If so please click the “Like”, Tweet or +1 buttons now at the top of article to share it. It helps this article show up ahead of old, outdated information. Thanks! If you’d like to know more, read on.

How iPhone Color & Capacity Affect the Price

iPhone 4S, iPhone 4 and iPhone 3GS photos and prices at Apple's Web Store
iPhone 4S, iPhone 4 and iPhone 3GS Prices

The iPhone 4S models are available in black and white. Does the iPhone’s color effect the price? No. Unlike the iPhone 4, there’s no difference in price of a black iPhone 4S or white iPhone 4S.

The iPhone4S is available in three storage capacities. Larger capacities have higher prices:

  • iPhone 4S 16 GB
  • iPhone 4S 32 GB
  • iPhone 4S 64 GB

iPhone 4 Price Falls

With the release of the new iPhone, Apple have dropped the price of the previous models. Apple still sells new iPhone 3GS (the “cheapest iPhone”) and iPhone4 (now the cheap iphone”) models.

The iPhone 4 price and iPhone3GS price are included in the iPhone price list above, as they’re a affordable alternative to the iPhone 4S.

Unlocked iPhone Prices

The prices quoted in this article are generally for unlocked iPhones. An unlocked iPhone comes without a SIM, and you can get a prepaid SIM or an account (postpaid) with any cellphone carrier.

You may have noticed that the iPhone prices for the U.S. are much lower than other countries. That’s because right now in America, you can only get an iPhone on a plan with AT & T, Verizon or Sprint. (At least there’s choices besides AT&T, unlike in the past.)

An iPhone plan makes the iPhone’s upfront cost cheaper. The prices quoted here are for the U.S. are on a phone plan or contract, and the prices for the other countries are for unlocked iPhones.

In the U.S., you will be able to buy unlocked iPhone 4S models in November. An unlocked iPhone will be more expensive up front, but you will be able to use it with any cell phone provider, and you won’t need to commit to monthly payments for a fixed period.

When travelling overseas, an unlocked iPhone can be used with a local mobile phone provider’s prepaid SIMs to avoid global roaming charges. This makes for cheaper phone calls.

iPhone Plan Prices

You can already sign up for an iPhone 4S plan in many countries. iPhone plans in Australia, for example, are available at $48 per month on Virgin, $59 on Optus, $59 per month on Vodafone, and $79 a month on Telstra.

It’s worth checking online for iPhone deals. In the past, some mobile phone carriers have had Internet specials.

If you’d like to report the cost of an iPhone 4S plan in your country, let us know in a comment below.

iPhone 4S Prices – More Countries

Here’s the iPhone price for France, Italy, Hong Kong, the Netherlands, New Zealand, Singapore, Spain, Switzerand & Sweden. Mac Crazy gets visitors from over 150 countries and territories; if your country’s iPhone price isn’t here, let me know and I’ll add it.

Country iPhone 3GS Price (8G) iPhone 4 Price (8G) iPhone 4S Price (16G) iPhone 4S Price (32G) iPhone 4S Price (64G)
España (Spain) 349 € 499 € 28 Oct 28 Oct 28 Oct
France 369 € 519 € 629 € 739 € 849 €
香港 (Hong Kong) HK$2,888 HK$4,688 28 Oct 28 Oct 28 Oct
Italia (Italy) € 399 € 549 28 Oct 28 Oct 28 Oct
Nederland (Netherlands) € 349 € 499 28 Oct 28 Oct 28 Oct
New Zealand NZ$599 NZ$899 Not released Not released Not released
Schweiz Suisse Svizzera (Switzerland) CHF 399 CHF 549 28 Oct 28 Oct 28 Oct
Singapore (新加坡的) S$548 S$788 28 Oct 28 Oct 28 Oct
Sverige (Sweden) 3.495 kr 4.795 kr 28 Oct 28 Oct 28 Oct

(Source: Apple’s Online Store)

You can compare these iPhone prices to the iPhone 4GS prices for Australia, Canada, Germany, the UK, and the United States at the top of this article. There are differences of €50 between European countries for the same iPhone model.

iPhone 4GS Release Date

The iPhone 4S hasn’t been released in all countries yet, so I can’t get the iPhone 4S price for these countries yet. In most of the countries with iPhone prices listed here, the iPhone 4GS will be released on 28 October. The exception to this is New Zealand, which has no release date shown at the Apple Store. Perhaps they’re all watching the Rugby World Cup?

Compare iPhone 4S Prices

I put together the YouTube video below in case you’d like to know how to quickly compare iPhone 4S prices between countries. Tip: To make the video crystal clear, click on “360p” and select “720p” HD resolution and click the fullscreen video button.

Thank You!

Thanks for coming to Mac Crazy and reading this article! If it answered your question, please help share it by clicking the Like, Tweet or +1 buttons below. Please leave a comment if you enjoyed this article, or if it didn’t answer your question about iPhone prices.

Categories
Uncategorized

How to Brighten and Dim a MacBook Screen – with HD Video

Is your MacBook screen dim? Or too bright? Using both photos and video, this article shows you how to increase the brightness of your MacBook screen and how to dim it. The article also explains why the MacBook’s display will sometimes brighten or dim automatically.

This article is useful for people new to Mac. It’s also a useful article to send to friends if they’re complaining their screen is too dim or too bright.

The high-definition video above  shows how to make your MacBook’s screen brighter and dimmer, and what it looks like when the brightness keys are working properly. Scroll down for photos, if that works better for you.

MacBook Screen Dark

This article started with an email from my mother:

Taz the screen on my putor is very dull like someone turned the dimmer down. Is there something I can do to brighten it up?
xx

I was worried something was wrong with my mom’s Mac, particularly the display’s backlight. Then I realised I’d never taught my mother how to increase the brightness on her MacBook’s screen. Perhaps her MacBook display had dimmed for some reason, and she didn’t know how to make it brighter.

I emailed my mom back:

Look at the top-row of the keys on your keyboard.

Towards the left, probably the second or third keys, there a two keys with pictures of suns on them.

A sun drawn like a circle with lines radiating out from it.

There’s a key with a small sun.
Then the next key has a bigger sun.

Press the key with the big sun.

Does that make the screen brighter?

Could mum’s problem be that simple? I waited. She wrote back:

You are a clever boy, obviously my brains. My sun keys are on the left and it worked beautifully. Thanks Taz.

Excellent! Problem fixed. I then got to thinking: “Perhaps other people haven’t been introduced to the Mac’s sun keys.” So I wrote this article.

The Mac Brightness Keys

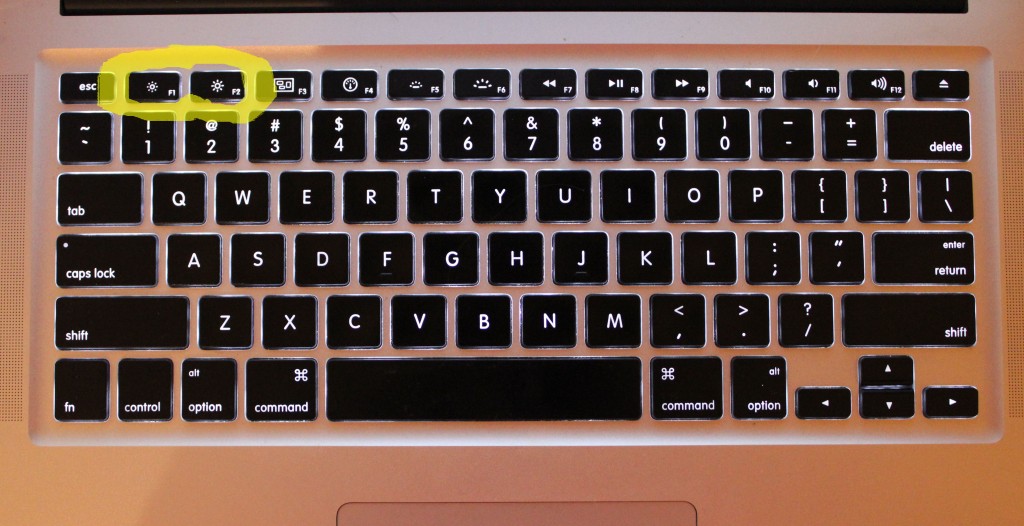
Close up photo of keys to brighten and dim MacBook Pro 15 inch screen

Brighten and dim your MacBook’s screen – the little sun (dim) and big sun (brighten)

Press the “big sun” key to make your screen brighter. Press the “small sun” key to dim the MacBook screen. When you change the brightness using the “sun keys”, the brightness level is briefly shown on screen. (You can see this in the video.)

What Macs do the Brightness Keys Work On?

The brightness keys works on the MacBook, MacBook Pro, MacBook Air and the iMac. It also works with any version of the Mac operating system, Mac OS X, such as Snow Leopard or Lion 10.7.

Make the MacBook Pro Screen Brighter

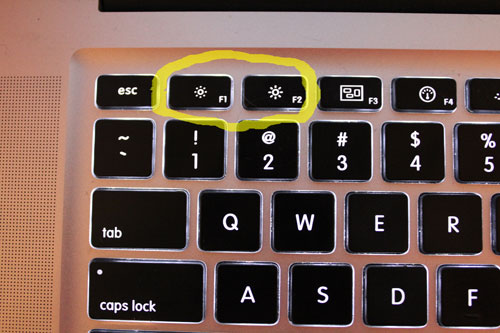
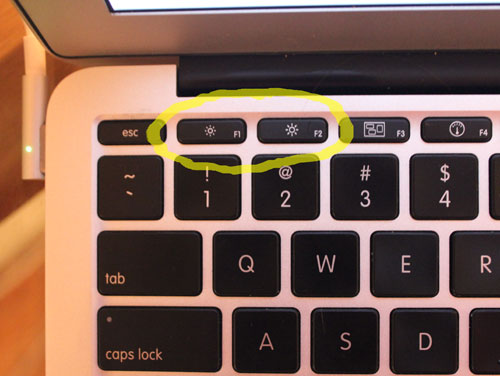
This photos shows where to find the brightness keys on a MacBook Pro. It’s a MacBook Pro 15 inch model pictured here. I’ve circled the brightness keys in yellow. The little sun and big sun keys, at the top of the keyboard, are only half the height of regular keys:

Here’s a close up:

Brighten a Dim MacBook Air Screen

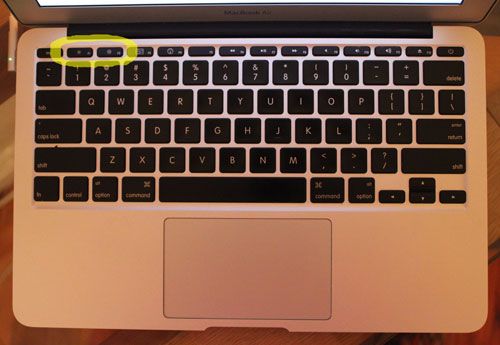
The brightness keys on a MacBook Air are in the same position as the MacBook Pro. See the keys circled in yellow here on an 11 inch MacBook Air:

The top row of keys, often called function keys, is particularly narrow on the MacBook Air. They’re even smaller than on the MacBook Pro, which can make them hard to spot. Here’s a close up of the screen brighten & darken keys on the MacAir:

Automatic Screen Brightness Changes – Ambient Light

MacBooks include a ambient light sensor. The sensor detects how it bright it is where you’re using your Mac.

If the room gets brighter, the Mac will automatically brighten the screen to maintain the screen’s readability in the brighter light. If the room gets darker, the screen will darken so the screen isn’t overly bright. This reduces eye strain, and saves power.

To see this working, take your MacBook to a darker room. Look at your Mac’s screen while you switch the light on, wait ten seconds, then off. You should see that when the change in the room’s light level happens, the Mac smoothly adjusts the display’s brightness. The brightness changes almost immediately, taking about two seconds to complete.

Automatic Screen Dimming – Idle Mac

You may notice that your screen dims considerably after a couple of minutes of not interacting with your Mac. By “not interacting” I mean not touching the trackpad or keyboard. This is to conserve power. It’s normal MacBook behaviour.

The Brightness Keys and External Screens

This brightness keys do not work for third party external displays. It’s possible, with Apple’s cleverness, the keys could work with the Apple LED Cinema Display and the Apple Thunderbolt Display connected as the main monitor for a Mac Pro or Mac Mini. If you’ve tried this and can tell us if it works, please leave a comment below.

Conclusion

Did this article help you dim or brighten your MacBook’s screen? If it did, please share the article by clicking on the Like, +1 or Tweet buttons. It takes just a moment – thanks!

If you still have unanswered questions or have suggestions to improve this article, please leave a comment below. Find more interesting topics and articles at the bottom of this page.

Categories
Uncategorized

MacBook Air Heat and Fan Noise Issues SOLVED

There’s been a number of complaints in forums about MacBook Air heat problems and fan noise or fan running constantly. What causes these heat issues? What’s the fix? Does it affect the i5 model as well as the more powerful i7?

This article addresses fan noise and heat issues with the current MacBook Air 2011 / 2012 models, released mid-July 2011.

Here’s a video a Mac Crazy user sent in of watching video online with his MacBook Air i5 13 inch. The fan is loud!

(Thanks to Rajulun for sharing this view with Mac Crazy – you are a star!)

MacBook Air Fan Noise

First, lets start with a bit of background of why the MacBook Air get hot and why it has a fan. The MacBook Air has one fan inside it, at least in the late-2010 & mid-2011 models. The fan’s job is to keep the MacBook Air’s chips from overheating by pushing hot air out the exhaust port. The exhaust port is behind the keyword, at the screen hinge.

The MacBook Air fan runs constantly by design. The fan runs at or above a minimum speed while the MacBook Air is running. On my late-2010 MacBook Air 11 inch, the minimum speed is 2000 revolutions per minute (rpm).

At this minimum fan speed, during use, the fan can’t be heard by most people. If you put one ear to the keyboard, you can hear the fan. Some people, in a very quiet room, with very sensitive hearing, may be able to hear the fan at the minimum speed.

When the MacBook Air is busy it generates more heat. The fan then runs faster to keep the Mac cool. At higher speeds, you can easily hear the fan.

This is a normal cause of fan noise on the MacBook Air – MacBook Air is busy, fans are keeping it cool. Fan noise is like sweating – it’s a response to strenuous activity.

Examples of activities that make the MacBook Air busier are:

  • running many apps,
  • using web sites with animation (Flash) or video,
  • playing games,
  • playing or editing video, particularly HD video

The room temperature will affect how fast the fan will need to run to keep the MacBook Air cool. In a hotter room, the fan will need to run faster.

The highest fan speed on my late-2010 MacBook Air is 6500 rpm. You can check your MacBook Air’s fan speed with the free iStat Pro dashboard widget. iStat Pro will also measure the internal temperatures of your MacBook Air.

If you have constant fan noise, and your MacBook Air is not doing heavier activities, your Mac’s System Management Controller (SMC) may be confused. You can fix this with a SMC reset.

MacBook Air Too Hot

The hottest temperature on the bottom of the case I’ve seen quoted in the press is 105F / 41C (AnandTech) and in the wild is 109F / 43C (thanks for commenting Corbin). This benchmark was running Half Life 2 Episode 2, which works both the main processor and the graphics processor – both of which generate heat. Both processors are on the same silicon chip in the new MacBook Air.

(If you have a higher MacBook Air 2012 / 2011 bottom case temperature, please take a screenshot and leave a comment below.)

If your MacBook Air is getting too hot, there are some possible fixes below.

Heat and Fan Noise: Just the MacBook Air i7, or MacBook Air i5 As Well?

The fan noise and heat issues are affecting the i5 MacBook Air as well. Complaints of the MacBook Air heating up, overheating and fan noise are not restricted to the Intel Core i7 MacBook Air. I’ve had a reader send in a video of his MacBook Air i5 with a loud fan.

MacBook Air Heat Issues and Fan Noise Causes

There are at least several possible causes for the MacBook Air high heat and noisy fan:

  1. Software functions that consistently use CPU are being used, e.g. video encoding, finding faces in iPhoto.
  2. Apps or other software running in the background is consistently consuming CPU.
  3. Adobe Flash, the technology used to deliver some animated ads in web pages and most web video is consistently using CPU. This is a specific, common case of the cause above.
  4. Software runs at startup that is not compatible with Mac OS X Lion. The software keeps trying to run and keeps falling over causing load on the CPU.
  5. The MacBook Air’s System Management Controller (SMC), responsible for controlling the fans, has become confused.

Cause #1: Software that Consistently Uses Processor

Software that is performing an activity that consistently uses can cause the MacBook Air to get very hot and the fans to run loudly. A few examples of heavy software are:

  1. Video export, encoding or format conversion (transcoding). For example, Handbrake for converting videos for display on iPhone or Apple TV.
  2. Importing photos to iPhoto or performing recognition of faces in your photo library.
  3. Playing some HD video. How much processor video playback uses depends on many factors, including video resolution (720p, 1080i, 1080p), frame rate, detail in video (bit rate), how sophisticated the encoding is (e.g. high profile), the video player used to play back the video, and how the video player is configured! Generally 720p is fine, 1080p is fine if it’s a lower bitrate Quicktime H.264 movie playing back in Quicktime, and other 1080i or 1080p (high bitrate or non-Quicktime format, e.g. MKV or AVI) will get the MacBook Air hot and fans will run.
  4. Playing web video. Web video uses Flash, and Flash video playback is less optimised than Quicktime. I’ve noticed that occasionally a web videos use several times more CPU than another at the same resolution. I suspect that is because some web videos uses formats that Flash is optimised for (probably H.264), and others use formats that aren’t optimised in Flash (probably non-H.264 Flash video ‘FLV’). I haven’t confirmed this.
  5. 3D rendering (e.g. Cinebench).
  6. Video editing and effects (e.g. Final Cut, Adobe Premiere, After Effects).
  7. Exporting a music track (mixdown), from a multi-track music project.
  8. Playing 3D games (e.g. Portal, Half Life).
  9. Running benchmarks.

If you are doing sustained processor intensive work expect it to get warm or hot and for the fan to become audible or noisy. Using either the main processor (CPU) or graphics processor (GPU) generates heat.

In these cases that MacBook Air is usually performing normally. Some of the heat is dispersed to the case, so the case feels hot. The  fan speeds up pull cool are in and push hot air out of the MacBook Air.

Cause #2: Software in the Background Consistently Consuming CPU

Every application running in the background uses power and heats up the MacBook Air. If you use less battery, your MacBook Air gets less hot. If it gets less hot, it doesn’t have to use the fan. And on the way, you might double your battery life.

You can see how much power each app is drawing, use the free software coconutBattery. To help cool down your laptop, quit background apps or pause them using the 3rd party software App Tamer.

Note that it’s not just apps running in the background that consumes power. Other background services (often called daemons) can also consume power. Mostly these are pretty efficient, but for power users, it’s worth checking.

See my article “MacBook Air Battery Life” for more info on reducing power usage and making your Mac cooler and quieter.

Cause #3: Adobe Flash Consistently Using the Processor

Flash is software that can be installed as a plugin to most web browsers, such as Safari, FireFox & Opera. Google’s Chrome browser includes Flash. Flash is mainly used to include animated and video ads in web pages, to deliver web video and provide games in webpages. Flash is not uncommon for charting. It’s also often used for entires sites for big product launches, like Hollywood movies.

Flash tends to use a lot of CPU. Most people who use Flash aren’t professional programmers, they’re usually creatives. One poorly written banner ad can swallow an entire core of your MacBook Air’s processor.

While the latest versions of Flash do some hardware acceleration for video playback, Flash still uses considerably more CPU to play video than native video players like Quicktime X.

Consider if a Flash banner ads is not visible: it’s in other browser tab, your web browser is in the background while you’re in another app (e.g. Word), or the banner is in part of the webpage that isn’t showing in the browser window. The Flash portions of webpages continue to run and consume your processor and battery even when you can’t see them.

Flash’s heavy use of CPU was running of the reasons Apple doesn’t include Flash on the iPhone or iPad, and why Flash doesn’t come preinstalled on the MacBook Air.

To minimize Flash’s grip on your processor, you have a few alternatives:

  1. Use one browser window at a time. Quit your browser when you’re not using it.
  2. Use the free software ClickToPlugin for Safari. It stops Flash automatically running; it requires you the click a Flash part of a webpage to make it run – which sometimes you do (e.g. a YouTube video).
  3. Deinstall Flash.
  4. Deinstall Flash. Use Safari without Flash. When you really need Flash, use Google Chrome instead of Safari. Chrome includes Flash built in.
  5. Use FlashFrozen ($0.99) to automatically stop Flash running in the background.

Some of these techniques can be combined. For example ClickToPlugin plus FlashFrozen.

If you watch video on websites that also have animated ads beside the video (instead of in the video), you’re getting the double penalty of Flash video plus Flash ads at the same time. ClickToPlugin might be a good option here. You can just click on the main video to enable it, and leave the ads disabled, giving you the best chance of the MacBook Air staying cool and quiet.

See “MacBook Air Battery Life 2011” for more background.

Flash seems to be the most common cause of the MacBook Air overheating and fan running fast.

Cause #4: Software Incompatible with Lion

Some software doesn’t work with Lion. If it contains software that runs in the background and restarts automatically, the software can start over and over again.

I’ve seen one case of this, when someone migrated five years of accumulated software from their old Mac to their new MacBook Air using Apple Migration Assistant. The person was very technical and fixed the broken software themselves. This may have been old HP printing software, but I haven’t confirmed this.

For the technically inclined, there wasn’t much CPU usage, but with the process continually respawning the was a high run queue for the CPU.

I’ve seen serveral cases where people an overheating MacBook Air and noisy fans ran the free Onyx utility and that fixed performance issues. Write a comment if you’d like more specifics. In none of these cases has anyone reported the root cause of the problem, but for now I’ll include these cases here.

Cause #5: System Management Confused / Needs Reset

Thanks so much to Chris posting a comment about this:

I was experiencing a similar problem on my new MBA 13″ with i7 (loud fan with nothing running), along with some other odd issues related to battery and power. System preferences (energy saver) claimed my battery was charged at 0% (though I knew that was not the case), and I couldn’t add the battery status to the menu bar (I would click that option, the menubar with reconfigure as if to accommodate the new icon, but then it would disappear). Furthermore, when plugged in to AC, I got no lights (green or orange) on the MagSafe adapter. The support page at http://support.apple.com/kb/ht3964 suggested that weird battery/power issues may be solved by an SMC reset, which I did. The fans have now stopped and the other symptoms that I mentioned have also gone away. Perhaps this can help with others.

So Chris’s MacBook Air symptoms were:

  1. Loud fan with no apps running.
  2. Battery showing 0% charged in Energy Saver in System Preferences.
  3. Can’t add battery status to the menu bar.
  4. Status LED on MagSafe power connector not lighting up when plugged in.

You may not have all these symptoms.

SMC reset instructions for a MacBook Air are:

  1. Shutdown your MacBook Air (go to the Apple menu and choose “Shut Down…”).
  2. Make sure your MacBook Air has external power. Connect the power adaptor, if it isn’t already.
  3. Using the Air’s built-in keyboard (not a plug in keyboard or bluetooth keyboard), of the left hand side of the keyboard press Control-Shift-Option and on the top right of the keyboard, the power key at the same time.
  4. Release all the keys at the same time.
  5. Press the power key to start the computer.

If this fixes your issue, consider replying to Chris’s comment below with a thank you for him.

MacBook Air Fan Noise and Heat Issues Fixed?

Did this help fix your MacBook Air fan running too fast / being too loud, of being very hot? Drop me a comment and let me know what you did, and how it worked for you. Your comment, like Chris’s, may really help others, as we’re still learning which are the most common causes, and what are the best solutions.

If this article helped, please clicking +1 or Like or even better link to this page from your blog or website. It helps people find this page ahead of older, less useful webpages. (MacWorld has 41 million links – help us catch up!) Thanks for visiting!

Categories
Uncategorized

MacBook Air Battery Life – 2 hours or 7 hours?

Apple claims 7 hours of battery life for the current MacBook Air 2011 / 2012 model. Upset buyers say the battery lasts 2 hours. What’s the truth? How much battery life will you get?

There’s a big range in battery life reported for the new MacBook Air (MBA) – in the article you’ll discover why. You’ll also learn how to get great battery life.

Some people are complaining of the new MacBook Air being too hot and running the fan too often. Others say its fine – a little warm sometimes, nothing unusual. You’ll learn the probable cause for this.

This article gives both real life times and benchmarks for the 2011 / 2012 MacBook Air‘s battery life. Both the MacBook Air 11 inch and MacBook Air 13 inch models are covered. The battery life for Core i7 processor upgrade is also compared with the standard Core i5 processor.

The battery times in this article are specifically for the current MacBook Air 2011 / 2012 model, released mid-2011 (July).

To piece together the MacBook Air battery life puzzle, information is used from:

This is a big article to write – there’s a lot of information to integrate, and lots of references, tricks & surprising findings I don’t want to leave out. Some people may be holding out on buying a new MacBook Air until the issue of battery life has been cleared up. For these people, I’ve written a short answer with the essentials until I’m able to complete the main article.

If you hang on until the end of the article (or just scroll down), you can also find out where you might get a discount on a new MacBook Air, from a company you already know. It just doesn’t occur to most people that they could buy their Mac Air there, and save a bit of money.

MacBook Air Battery Life – The Short Answer

  1. The battery life estimates that Apple gives – 7 hours for MacBook Air 13 and 5 hours for MacBook Air 11 for wireless web – are possible.
  2. The short battery times seen in forums – two to three hours – are possible too.
  3. Long battery life comes mainly from the processor being idle most of the time, saving lots of power.
  4. Making the processor just a little busier can burn down the battery surprisingly faster. Just 5% utilization of one of the Air’s two CPU cores can translate into 20 to 30 minutes less battery.
  5. Flash, the technology used for a lot of web video and animated ads, seems to be the “usual suspect” for most people in using CPU and using up their battery. One bad Flash advertising banner can use a whole CPU core.
  6. Apple ships the new MacBook Air without Flash installed. If you use the Air that way, you will most likely reach Apple’s “wireless web” battery life estimates.
  7. You could uninstall or switch off Flash to maximize your MBA battery life. Most people, however, want Flash to watch video on the Internet.
  8. There is software such as ClickToPlugin (free) for Safari, that disables Flash items on web pages until you click on the Flash item to enable it.
  9. Leaving applications open swallows battery. I doubled my battery life by closing apps I wasn’t using.
  10. You can see how much power your apps are using with the excellent free app coconutBattery. I’d close an app and watch the number of watts being used drop. Recommended.
  11. Some software installs startup items, daemons, extensions or background processes that consume CPU. Possible background battery abusers are Adobe CS5, Microsoft Office 2011 and Skype. For example Outlook on my Air is checking my office emails in the background. If you install a lot of software, you probably have a lot of software running in the background that may not be visible as an app. Quit or turn off what you can.
  12. If you use Apple Migration Assistant to move your previous Mac’s software to your MacBook Air, you may have dragged years of unused background software across. If you’re guzzling battery, try a clean install of Mac OS X Lion and the apps you actually use.
  13. Screen brightness affects power use, but the number of apps running has a much bigger effect.
  14. MacBook Air i5 vs i7 battery consumption: the battery consumption for the i7 vs the i5 is roughly the same for nearly all use. Battery time for the i5 and i7 is very close on the 13 inch MacBook Air. The i5 on the 11 inch MacBook Air get roughly half an hour more battery time that the i7 MacBook Air 11″.
  15. You don’t need to see high CPU usage in the Activity Monitor app for your battery to be guzzled. Background software starting, failing and restarting repeatedly will eat battery.
  16. If your MacBook Air has short battery life inexplicably, running select features of the Onyx utility has fixed battery life problems for some people.
  17. Another possibility if your battery doesn’t last long is to try a SMC reset of your MacBook Air. I haven’t confirmed this helps – it’s typically done when the MacBook Air fan is running constantly. Please leave a comment if it helps your battery life.
  18. Yes – this really is the short answer! Now you know why I’m tackling writing this article in parts!

Okay, here they are: MacBook Air battery life estimates for different patterns of usage. For all of these, the 13″ Air does about half an hour more, the 11″ Air around half an hour less.

  1. Wireless Web (no Flash) – roughly 7 hours
  2. Wireless Web (Flash) – roughly 5 hours
  3. Wireless Web (Flash), Downloading & Video – roughly 3.5 hours
  4. Lots of apps or background software running as well – roughly 2.5 hours

(Source: mostly AnandTech)

If you already got what you’ve needed from this article and you’ve read enough, please consider clicking +1, Tweet, Like or even better linking to this article from your website or blog. There’s a lot of misinformation about MacBook Air battery life – I’m aiming to clean that up and consolidate it here. Still, it’s not much use unless people can find this article in Google. Making a link to this article with the text “MacBook Air Battery Life” helps this article make the first page for search results. Thanks if you can!

Oh, and don’t forget the MacBook Air discounts, if that’s of interest.

MacBook Air Battery Capacity

Let’s start with facts. The MacBook Air (MBA) comes in two sizes – an 11 inch ultraportable, and a 13 inch for more general use. (If you want some facts to help decide between the models, see “MacBook Air 11 or 13 inch – which is better?”.)

Fact #1: The MacBook Air 11 inch has less battery life than the 13 inch. This is because the 11 inch Air has a smaller battery.

The battery for both size Macs is a lithium polymer battery. The 11 inch MBA comes with a 35 watt-hour battery. The 13 inch MBA, being larger, can fit a bigger battery. The MacBook Air 13 has a 50 watt-hour battery.

Here’s a table of the battery capacity for the current MacBook Air models. I’ve included the MacBook Pro battery capacities for comparison:

Apple Laptop Model Battery Capacity
MacBook Air 11 inch 35 watt hour
MacBook Air 13 inch 50 watt hour
MacBook Pro 13 inch 63.5 watt hour
MacBook Pro 15 inch 77.5 watt hour
MacBook Air 17 inch 95 watt hour

The 13 inch Air has 43% more battery capacity that the 11 inch Air.

Offsetting  the 13″ larger battery advantage is that the 13 inch Air will use more battery for the screen backlight because of its larger screen.

The 13 inch Mac Air’s screen is about 25% larger by area than the 11″ Mac Air, so the 13″ Air – at the same brightness – would pull roughly a quarter more juice for the screen. Complicating the screen size / power use comparison is the fact that MacBook Air’s use screens from two different manufacturers – Samsung & LG. The LCD panel’s power requirements may be different.

It is clear that the 13 inch MBA has more battery life than the 11 inch MBA, even with the power consumption of its bigger screen. Specifics on this battery length advantage of the 13 inch model to follow.

MacBook Air Battery Life – According to Apple

Now let’s get the official story. Apple gives the following estimates on its website for the new MacBook Air’s battery life:

Model Battery Life for Wireless Web
MacBook Air 11 inch 5 hours
MacBook Air 13 inch 7 hours

These estimates are unchanged from the last-2010 MacBook Air models. These previous models used Intel Core 2 Duo processors (C2D). The late-2010 MacBook Air models have excellent battery life, often exceeding Apple’s five and seven hour battery life estimates.

Apple’s battery life estimates for the MacBook Air 2011/2012 models are impressive. Keep in mind Apple asserts the new MacBook Airs have 2 to 2.5 times the processing power over the last MacBook Air model. The new MacBook Air has new Intel technology integrating the graphics processor (GPU) onto the same silicon chip as the main processor (CPU).

This first generation of ultra low voltage Intel Core processors) benchmark up to three times faster than the previous Core 2 Duo models. Apple gives exactly the same battery life estimates as the previous models. Is this believable?

The Core 2 Duo processors in the late-2010 MacBook Air are in fact rated for roughly the same peak power usage as the Intel i5 and i7 processors in the 2011 / 2012 MacBook Air – around 17 watts. It’s plausible – on paper – that the new i5 i7 models could match the battery life of the previous models.

MacBook Air Battery Life Reported in Online Forums

Okay, what’s happening out there in the wild? All of these battery running times are for the 2011/2012 MacBook Air models with Core i7 or i5 processors.

Forum User MacBook Air Model Battery Life Apps
sabrelli MacBook Air 5+ hours Web, Word, Excel
Reading1241 MacBook Air 3 to 3½ hours Web (Flash Blocked)
Foam Roller MacBook Air Just under 7 hours Web, a Couple Short Videos, Excel
anonymous MacBook Air 3½ to 4 hours
Horrorking MacBook Air 6 hours Web
Its Cam MacBook Air 5+ hours
Jim Bailey 11″ MacBook Air 3½ hours Activity Monitor, Others
Shane (alcheme) MacBook Air 11″ 2 to 3 hours; with Flash disabled 5 hours Web
Xavier Lanier 11″ MacBook Air i5″ 4 hours 50 minutes Web, Writing, Email, iPhoto
DMC MacBook Air 11″ i5 2 hours
pharrel MBA 11″ i5 4 to 5 hours Web
Riker88 MacBook Air 11″ i7 3½ to 4 hours Web, MS Office
jaa 11″ MacBook Air i7″ 3½ to 5 hours
Erik R MacBook Air i7 11″ 2½ hours Sparrow, iTerm, Mail, iCal, Reeder, Skype, Trillian, etc
ryanluke 11″ i7 MacBook Air Less than 2 hours
Onitsuka Tiger MacBook Air 13″ 3 to 4 hours Web, Music
Digu 13″ MacBook Air 5 hours Web
w1cked MacBook Air 13″ i5 4 – 5 hours
jules667 13″ MacBook Air i5 Lucky to get 5 hours Web
ryu74 MacBook Air i5 13″ 4½ hours Software Development
Ghostly MacBook Air i5 13″ 8 to 14 hours Web, Word Processing
Iverson76ers MBA 13″ i5 3 to 4 hours Web
Jimmy Obomsawin MacBook Air 13″ i7 2½ to 3 hours Web
Vics MarBook Air i7 13″ 5 hours
addisonm MacBook Air i5 4 to 6 hours MS Word
Jason Fear i5 MacBook Air 7 hours (projected)
iccaprar MacBook Air i7 3½ to 4 hours Web (Flash Blocked), PDF
Matt Hardy i7 MacBook Air 2 to 2½ hours (before fixing issues from Lion upgrade) Text Editing, Web

We’ve got two to seven hours battery life across the responses, with one user claiming up to 14 hours. How can there be such a very wide range of battery life, especially as many users are just using the web? Let’s look at some controlled battery tests from MacBook Air reviews.

MacBook Air Battery Life Test by Macworld

Jason Snell at Macworld.com tested six models of the new MacBook Air, in both the 11 inch and 13 inch sizes, with the Intel i5 and i7 processors. The battery test is to loop playing a video in full-screen.

Here are the MacBook Air battery times Macworld got:

MacBook Air Model Battery Life
MacBook Air 11″ i5 4GB 3 hours 25 mins
MacBook Air 11″ i7 3 hours 22 mins
MacBook Air 13″ i5 5 hours 20 mins
MacBook Air 13″ i7 4 hours 53 mins

Notice there’s not that big a difference between the times for the i5 and i7 processors. So for fullscreen playback of a looped video, we have 3½ hours for the 11 inch Air, and 5 hours for the 13 inch Air.

MacBook Air Battery Life Testing by Engadget

Engadget’s standard battery life test is to loop playing a video. Playing a video is typically drains a battery faster than browsing the web. On their 13 inch MacBook Air i5, Engadet got 5 hours 32 minutes of battery time.

Tim Stevens, the reviewer, concludes:

The seven hours Apple advertises for the 13 (five for the 11) is well within reach if you’re not doing anything too taxing.

Tim also noticed that the MacBook Air 2012 / 2011 model lasted one hour more than the last year’s MacBook Air model.

LAPTOP Magazine Tests MacBook Air Battery Life

LAPTOP Magazine tested the battery life of a 2011/2012 MacBook Air i5 13 inch with continuous web browsing. Web browsing typically uses less power than video playback, used in some of the other battery life tests referenced in this article. LAPTOP Mag’s test gave 6 hours 25 minutes of battery life.

How Can the MacBook Air’s Battery Life Be So Short?

The current MacBook Air models have an amazing secret power. The Intel processors in the current MacBook Air lineup are in fact very, very special. Under a light workload, the ultra low voltage Intel Core i5 or i7 processor in a MacBook Air, runs at just 1.6 to 1.8GHz, and consumes little power.

What most people don’t know, is that the MacBook Air processors are firebrands that can speed up to 2.9GHz and match the performance of the processors in the 2010 MacBook Pro 15 inch and 17 inch models, and even match the current 2011 / 2012 MacBook Pro 13 inch model. The base MacBook Air, costing $1,000, has comparable processor and storage performance to my top-of-the-line 15 inch MacBook Pro purchased August 2010 for $4,000. That is simply amazing.

The MacBook Air’s high performance doesn’t come without cost. When the MacBook Air processor runs at full speed, it drinks a lot more power than when lightly used. Combine the capacity to run fast with a thin and light lithium polymer battery (read small capacity) and you have the possibility of short battery life. The battery won’t last long when software slams the CPU, either because the software is genuinely working hard, or because the software is not efficient.

If software was written to be energy efficient, software would only use the compute cycles it really needs. The MacBook Air would hardly ever rise over it’s resting heart rate. Unfortunately, the primary consideration for software is getting it working and released. Many programmers never think about the effect of their software on your battery. A poorly written animated Flash ad can consume a whole processor core. (Which is why Apple didn’t allow Flash on the iPhone, iPad & iPod, and why Flash no longer comes pre-installed on new Macs.) Apparently watching Netflix, which uses Microsoft’s Siverlight technology, can similarly eat a whole processor. Apple’s own iCloud sync process use some battery, as will hourly Time Machine backups.

The good news is some software is improving it’s processor and battery efficiency: Flash for Mac seems to have gotten much better over the last six months. I just tried playing some full HD (1080p) movie trailers on YouTube in Safari: Avatar used just 9% of one processor core, and the Lord of the Rings used 13%. It looks like Flash is now using the graphics processor for video decoding rather than the central processor. That’s a great improvement.

Full size laptops have much higher capacity batteries; the 15″ MacBook Pro’s battery capacity is twice that of the 11″ MacBook Air. So full size laptops have the battery capacity to last longer when their processor is working hard. Having a MacBook Air is like having a supercar that can go 200 miles per hour (320km/h), but has only a 6 gallon (22 litre) gas tank.

Using processor power generates heat. On top of the compute processor, these special i5 & i7 processors have the entire video processor, the Intel HD3000, on the same piece of silicon. Together this central processor (CPU) and graphics processor (GPU) can generate a lot of heat. When either processor is busy – and particularly when both processors are busy – the fan needs to run to keep the i5 or i7 chip in the MacBook Air from overheating. The MacBook Air is little, so it’s fan is little, and a little fan needs to rotate fast to push enough air to cool the processor. If the MacBook Air is under load, the MacBook Air fan can be noisy.

The last generation of MacBook Air models (released late 2010) look identical to the current Mac Air, but contain a Core 2 Duo processor. The Core 2 Duo’s performance is a 2 to 3.5 times slower than the Core 2 Duo. The Core 2 Duo does have one advantage over the i5 & i7: it can’t work as fast, so it can’t consume as much power. I could easily get over five hours battery life on my late 2010 MacBook Air 11-inch Core 2 Duo without doing anything special. If I’d applied the battery optimisation tips in this article, I’d probably get over 8 hours battery life. If you want great battery life and aren’t concerned with performance, get the MacBook Air Core 2 Duo 11 inch or 13 inch – they’re cheaper, and still available new.

To match the long battery life of the previous MacBook Air model, Apple could have speed limited the new MacBook Air’s processors. This would extend battery life at the cost of performance. Why didn’t Apple speed limit the processors? Well, having all the power in such a small package is just too attractive!

Since I got my Core 2 Duo MacBook Air, I hardly use my MacBook Pro. The MBA is light & svelte rather than big & awkward, and due to it’s flash storage, it’s fast – the Air makes computing more casual, convenient & fun. I don’t want to lug a Mac Pro with a DVD player and big screen around. If I need a big screen, I’ll plug one in – they’re cheap. When I did video work on the Core 2 Duo Air, its slow processor became obvious and I wanted my Mac Pro again. And if I wanted fast connections into my Core 2 Duo MacBook Air, like Gigabit Ethernet, and Firewire, I couldn’t.

With the latest MacBook Air, these two reasons to switch back to my MacBook Pro are gone. The i5 & i7 processors in the current MacBook Air are fast enough for video work. With the introduction of the Thunderbolt port in the current MacBook Air, just arrive at home or the office, plug in a tiny connector, and connect a huge external display and make ultrafast connections (1GB per second) to networks, fast disk arrays and other peripherals. The size and weight of the MacBook Air is the future of laptops. I suspect Apple’s MacBook Air engineers feel the same way, and they’re gradually removing reasons why you’d need a hefty laptop. That’s why I suspect Apple engineers couldn’t bring themselves to hobble the processors, even though this makes it possible to quickly burn the MacBook Air’s battery to the ground.

It would still be possible for Apple to add option to the Energy Saver panel of System Preferences to limit the processor speed when on battery. I hope they do.

Are you Buying a New MacBook Air?

If you’re buying a new MacBook Air and you want to buy from a trustworthy company, it’s worth checking Amazon.com’s current prices. Follow these links to get the current MacBook Air prices at Amazon:

At the time of writing, all the MacBook Air’s linked above come with free shipping.

If you click one of the links above and do choose to buy your MacBook Air from Amazon: (a) you may get your new MacBook Air a bit cheaper, and (b) Amazon will pay me a commission. This supports me to keep writing good Mac articles.

Thank You!

Was this article helpful? If you link to this article from your blog or website, or click the “+1” or “Like” buttons, it really helps share this article – thanks! (I’m playing catch up with MacWorld, who have 41 million links.)

Got comments or questions? There’s a comment form at the bottom of the webpage.

Categories
Uncategorized

Is the MacBook Air i7 really only available online?

Can you really only buy a MacBook Air i7 from Apple’s online store? What if you don’t want to wait 2 to 4 days – perhaps longer – for your MacBook Air i7 to arrive? What if you want to take an i7 MacBook Air home today?

Mac Crazy investigates whether its possible to buy a MacBook Air i7 2011 / 2012 model over the counter today.

How to Buy a MacBook Air i7 – What Apple Says

MacBook Air 13 inch mid-2011 photo taken from raised position in front
The MacBook Air i7 - Do you want one today?

The MacBook Air’s technical specifications on Apple’s website say the new MacBook Air i7 is only available at Apple’s online shop:

$1199 model configurable to dual-core 1.8GHz Intel Core i7 with 4MB shared L3 cache, only at the Apple Online Store.

Is this true?

Benefits of Buying a MacBook Air in the Apple Store

If you can buy a MacBook Air in store, you can save the time waiting for it to be delivered. You take it home (or to work) now.

Another advantage to buying a MacBook Pro at a physical Apple Store is business pricing. If you have a business, the Apple Store business team also give you special business pricing.

Emeryshores, a Mac Crazy reader in Tennessee, says he can save 9.25% off a MacBook Air by buying it from an Apple Store on a tax free weekend.

Does the Apple Store carry stock of the MacBook Air i7?

I checked the stocks of MacBook Air available at my local Apple Store. That’s an official Apple-owned store, not a Mac reseller.

What I found is that my local Apple Store carried stock of the MacBook Air (MBA) with the fast, new Intel Core i7 Sandy Bridge processor. They had the i7 MacBook Air in both the 11 inch and 13 inch sizes.

(By the way, if you’d like to more information about whether to buy an i5 or i7 MacBook Air model, see “i7 vs i5 MacBook Air – is the upgrade worth it?”.)

This matches my experience with buying a MacBook Pro i7 15 inch in late 2010. The high resolution antiglare display was officially only available from Apple online. I dropped into the Apple Store at Bondi, and they had an i7 MacBook Pro 15″ with an antiglare display in stock. This saved me the two to three week wait at that time for MacBook Pro with a custom configuration.

The Apple staff member explained that they don’t make any changes to the MacBook Air configuration at the Apple Store. This means, you get the size of flash storage (SSD) that’s preinstalled – you can’t downgrade or upgrade it at the store.

Stock of the i7 MacBook Air at Apple Stores in Different Countries

The Apple Store I checked is in Sydney, Australia. I asked the salesperson whether other Apple Store’s would also carry stock of the MacBook Air i7, particularly the U.S. He said that other Apple Stores have “got what we’ve got”.

At present we’ve confirmed the i7 MacBook Air has been available at Apple Stores in:

  1. Sydney CBD, Sydney, Australia
  2. Montreal, Canada
  3. Pioneer Square, Portland, Oregon, U.S.A.
  4. Pasadena, California, U.S.A.
  5. Chadstone, Melbourne Australia
  6. Bridgewater, New Jersey, U.S.A.
  7. Natick, Massachusetts, U.S.A.

Thanks very much to readers who have commented on availability at their store!

I’m interested to hear whether your local Apple Store has stock of the MacBook Air i7. Please leave a comment here about what you find, if you can.

Conclusion

So it’s likely that your local Apple Store has stock of the 11″ & 13″ MacBook Air i7 right now.

Thank you for visiting Mac Crazy! If you found this article useful, please help spread the word by clicking the +1 or Tweet buttons below.

Categories
Uncategorized

Can a MacBook Air run a large external display?

Can the latest MacBook Air handle a large external screen? Is the Air powerful enough? How is the response? Is there any flicker? To find out, we tested the new MacBook Air with the 27 inch Apple LED Cinema Display. See the video of the test for yourself.

Can the MacBook Air Handle Big External Displays?
– The Short Answer

Photo of a 27 inch external screen being used by a mid-2011 MacBook Air i5 11 inch model
The new MacBook Air 11″ happily using a 27 inch Apple LED Cinema Display

The short answer is yes. The new MacBook Air ran the big, high resolution Apple LED Cinema Display without any sense of strain. Windows, images and videos moved on the monitor with fluidity and crispness.

From reports on the web, the Apple LED Cinema display may flicker with both the MacBook Air and Pro, when at a brightness below level 7. There doesn’t seem to be a fix yet.

For this article, we just did a quick test. To be completely sure the MacBook Air can drive your screen, please test your screen with a MacBook Air to your satisfaction before buying. Tests with other monitors, different applications, alternative cables and extended use may reveal more.

If this enough information for you? If so, please help share this article by clicking the Tweet or Google +1 buttons above. If you’d like more details, or to see video of the test, please read on.

What If You Want a Cheaper External Display?

If you don’t want to spend $1,000 on an Apple Thunderbolt Display, I’ve written some tips for buying a cheap external display for MacBook Air. I’ve included the name of the brand & model I personally use – only $152 for a 23 inch full HD screen, as well as tips for using an external display, born from long experience.

The Graphics Processor in the New MacBook Air

Before covering testing the MacBook Air with a big external display, it’s worth mentioning the graphics processor in the MacBook Air (MBA). The graphics processor in the MacBook Air is the Intel HD Graphics 3000. This HD 3000 graphics processor is actually part of the  MBA’s Intel Core processor –  they are a single silicon chip.

What sort of graphics performance can you expect? As a low cost graphics solution, the HD 3000 uses the Mac’s main memory, rather than dedicated graphics memory. Mid to high-end video cards use dedicated graphics RAM like GDDR5, because graphics RAM is much faster than the computer’s main memory. Specialized graphics memory provides the extraordinary performance needed to handle modern three dimensional (3D) graphics on big screens. There is a cost for this performance: fast graphics cards with dedicated memory use more of a laptop’s battery, generate heat, causing fans to run creating noise, add to the laptop’s size and cost more. These disadvantages – battery life, laptop size, fan noise from heat and cost are why the Air uses an integrated graphics processor.

The HD 3000 is fine for two dimensional graphics (2D) graphics, typical in web browsing, word processing, spreadsheets, Photoshop, music production and basic video editing.

The HD 3000 handles high definition video playback – hence the HD in the name. I’ve only tested the MacBook Air with HD 720p resolution video. (Sorry: it was a quick test, the Air didn’t have any 1080p samples on it, and I didn’t have admin rights to install Flash to play a full HD video.)

The HD 3000 also does 3D graphics. The 3D graphics on the Air are only good enough for playing basic games or older games. If you are a gamer, do not buy a MacBook Air – graphics will not update quickly or smoothly for modern games. For gaming, the MacBook Air is the wrong tool for the job.

If you’re needing a more powerful graphics processor for 3D modelling, professional video editing, special effects production or gaming, buy a MacBook Pro instead. That’s what a MacBook Pro is for!

The Setup for Testing the MacBook Air with a Large External Monitor

I tested connecting a high resolution external display to the new MacBook Air 11 inch mid-2011 model, with a Core i5 processor. I chose this model as it is smallest and least powerful of the new MacBook Air models, with a 1.6 GHz Core i5 processor. If this model can handle a big screen, the faster and larger variants of the MacBook Air (11″ i7, 13″ i5, 13″ i7) should have no problems.

We tested the MacBook Air with a 27 inch Apple LED Cinema Display. The Apple Thunderbolt display, which evolved from the LED Cinema Display wasn’t available yet. The maximum resolution for an external display for the 2011 MacBook Air is 2560 by 1600 pixels. I tested with the LED Cinema display as its resolution – 2560 by 1440 pixels – is very close to the MBA’s maximum.

Luckily, the Apple LED Cinema Display is the forerunner to the new Apple Thunderbolt display, so I could get an idea of what the Thunderbolt display will be like.

Connecting Displays to the MacBook Air

The new MacBook Air connects to external displays through its Thunderbolt port.

The Thunderbolt port is the physically the same as the Mini DisplayPort in previous MacBook Air models and other Macs. The Thunderbolt port is backward compatible with the Mini DisplayPort. Thunderbolt expands on Mini DisplayPort’s ability to connect displays, adding the capacity to connect high speed peripherals through the port. High speed storage or a fast Gigabit Ethernet network connection can be added through Thunderbolt.

Thunderbolt’s backward compatibility with Mini DisplayPort means you can connect displays to the MacBookAir with VGA, DVI, Dual-Link DVI and HDMI cables, as long as you have the correct Mini DisplayPort adaptor.

Testing a Big Screen with the New MacBook Air

We connected up the great big LED Cinema Display. The mid-2011 MacBook Air can run even a big, super highres display like the Apple LED Cinema Display!

First we tried web browsing. Web pages came up on the screen, no sense of slowness or lag when using the external display.

Testing Full Screen HD 720p Video on an External Monitor

We then tried playing a fullscreen HD 720p video on the big screen:

As you can see, the 720p video played very cleanly on the big Apple display.

I would have liked to test full HD 1080p video playback, but there was no 1080p video loaded on the Air. Streaming 1080p from YouTube also wasn’t possible, as the MacBook Air didn’t have Flash installed, and I didn’t have admin access to install Flash. Sorry.

Testing Interface Responsiveness with Two 720p Videos on the External Screen

In the next test we run iMove, start two 720p videos and then show all windows using Mission Control. Notice how responsive the interface is.

MacBook Air and Flickering on Built-In and External Displays

There are cases of screen flicker with the previous model MacBook Air’s built-in display, show on YouTube, and described on the Apple Support Forum. Apple replaced the user on YouTube’s MacBook Air and he said he loves his MacBook Air.

The reports of a flicker on external screens with previous MacBook Air models (late 2010), for example on Cult of Mac and MacRumors.

I’ve had flickering on my MacBook Pro to my 24″ screen – colors flicked on and off. The issue was due to the Mini DisplayPort adaptor not being pushed all the way in, or the monitor’s cable being loosely connected to Mini DisplayPort adaptor. Ensure all the video connectors were flush fixed the problem.

There are also reports of flickering on the 27″ LED Cinema display at low brightness levels with the new mid-2011 MacBook Air. The flickering happens with the brightness set below 7. This has been confirmed by multiple people and appears to happen with MacBook Pros as well. It appears to an issue with the display’s power supply.

Given this affects both the MacBook Air and Pro, which have different graphics processors and chipsets, chances are this is a power-related Apple Cinema Display problem. This issue has not been resolved.

Conclusion

The 2011 MacBook Air did an excellent job of driving the 27″ Apple LED Cinema Display. The MacBook Air will probably have no problems driving most external screens with reasonable 2D graphics and video performance.

Reports on the web say a flicker occurs on the Apple Cinema Display at a brightness below level 7. This is probably a Apple Cinema Display problem.

This was just a quick test. Technology is never perfect. Different cables, monitors, or apps may yield different results. If you are want to be completely sure the MacBook Air can drive your screen, please test your screen with a MacBook Air before buying.

If you’re looking for a cheap MacBook Air display, remember I’ve written some external display buying tips, including the brand & model of screen I use.

Thank you for visiting Mac Crazy! Did you find this article useful or interesting? If you did, help spread the word by clicking the +1 or Like button below. It only takes a moment.

If you have a question to ask or comment to add, please use the comment box at the bottom of the page.

If you want the latest Mac news and tips, follow MacCrazy on Twitter by clicking the Follow button below.

[tfb username=’maccrazydotcom’ count=’false’ lang=’en’ theme=’light’]